I recently received a message asking how to repair a busted seam on a New Era cap, and luckily for the person who asked I had a cap that also needed this repair. With the convenience of having the same problem with one of my caps, it was a perfect opportunity to kill two birds with one stone and repair my cap along with teaching him how to repair his.
What you will need:
1. New Era Cap with a broken seam.
2. Amazing GOOP glue.
3. Clamp
My Kansas City Royals "Diamond Collection" cap
Step 1
With the busted New Era cap, you will want to pull apart the busted seem to expose the silk lining underneath, should the busted seem look like this, my tutorial will be able to help you fix the issue.
Step 2
With the busted seam, what you will need to do is pick up a glue called "Amazing GOOP", this glue is a silicone based glue that will fuse perfectly with fabric and will be flexible enough for daily wear. This glue can be purchased at any Wal-Mart or Hardware Store located near any paint section, if you have any trouble looking for the glue, you can purchase from my link located below the picture from amazon.com.
Step 3
Now what you need to do, is pull back the fabric and lay the glue on the underside of the wool/polyester along with the black silk piping, the glue should ONLY be applied to the underside of the material, so that none will be seen on the outside of the cap when it is completely dried.
Step 4
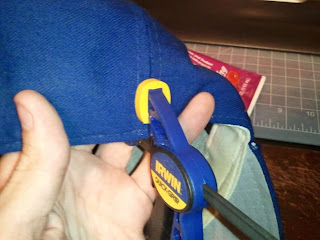
When you have laid the glue down, just simply fold the fabric on top of it again. When it is laid flush just simply use a clamp, magnets, or any heavy object to keep the fabric pinched. Be sure to leave the glue drying for at least 24 hours, I would recommend 2-3 days just to be on the safe side.
Step 5
After a few days have passed, you will be ready to unclamp the cap to see the completed repairs. After the repairs are completed, I wouldn't recommend trying to stretch the cap or do anything to put stress on the seam again, but GOOP is some strong stuff and will be pretty mighty when used on a fabric.
I hope that my tutorial will help in any repair to your caps that have suffered damage.
Any advice that you take from me does not hold me responsible for any further damage that is done to your cap, for that you are doing all of the steps yourself and if one followed my steps correctly as seen above, the final result should be the same leaving the hat with no added damage.


Great stuff, if you really love a cap that much it's good there's a way to repair it. Nice post mate, keep it up!
ReplyDeleteman that looks good as new, I thrown out numerous caps due to minor rps such as this
ReplyDeleteLove this kind of stuff, really cool to see.
ReplyDeleteDefinitely good advice! I'll start doing this instead of tossing my old hats. Thanks man!
ReplyDeleteThasnks for this, I actually have a Jays hat (lol i know) that is too big for me and this just might do the trick! Thanks man!
ReplyDeleteI'ma bookmark this
ReplyDeleteWill keep this in mind in case anything happens to my hats, god forbid!
ReplyDeleteAll that hassle. Why not just get a refund?
ReplyDeleteBookmarked!
ReplyDeleteThanks for this :) I have some busted old hats that needs repairing.
ReplyDeleteVery useful tip my friend.
ReplyDeleteI love caps and i have a lot so old ... and i want to repair them
I fixed one of my hats with this today! very helpful I hope you dont mind I wrote this down and will use it later!
ReplyDeleteLooks good,i love thoes caps.
ReplyDeletewoww this is really helpfull for me :D!!
ReplyDeleteWow, that was easy! Thanks for the info!
ReplyDeleteGreat tip! So usefull for those of us who can;t buy new hats for a while!
ReplyDeleteI probably see this hat on a daily basis.
ReplyDeletecool fix up bro
ReplyDeleteoh wow, nice fix
ReplyDeleteGreat blog! You should definitely keep up the work because you’re excellent at it!
ReplyDeleteVisit mine @ http://www.d22-zone.com
Great fix there. You definitely seem to know what you're doing.
ReplyDeleteNow just come up with a way to fix the bill when it gets ruined aha.
ReplyDeleteIt looks just like new :D
ReplyDeletesweet guide for fixing caps (:
ReplyDeleteThis guide is very well written! bookmarked for sure!
ReplyDeleteDude thats a sexy tutorial thanks.
ReplyDeleteInformative tutorial, thanks man, I have several old New Era hats that could use some TLC. Nice blog btw.
ReplyDeleteGreat rapair man, thanks for the tips.
ReplyDeletethis is a really cool post... thanks for the tutorial!
ReplyDeleteLooks as good as new!
ReplyDeletegreat tip, my cap says thanks.
ReplyDeleteI am not a cap wearer but that may change as my hair begins to recede!
ReplyDeleteNice repair guide!
ReplyDeleteAwesome,now do not have to throw their hats into the trash.
ReplyDeleteVery nice guide, now to find out if this sort of thing would work on a snapback...
ReplyDeletegreat tutorial! =D
ReplyDeleteThat's great advice, my hats keep breaking and this is helpful.
ReplyDeleteI'd have just left it. But I'm the kinda guy who still has jeans from when I was 15.
ReplyDeleteSweet cap!
ReplyDeleteDamn, simple and effective. Nice going, man.
ReplyDeleteAwesome guide!
ReplyDeleteNot bad, not bad :)
ReplyDeleteIt's really smart guy you are. But actually the sticthes on this cap were bad actually from our photo, I doubt it's fake new era?
ReplyDeleteChina baseball cap,China customized cap,China caps, China trucker caps.china baseball cap manufacturer.wholesale cap China, wholesale baseball cap China China cap factory , cap China, caps China,